
.png)
- Details
Barcodes and scanners

Hassle-free tagging of equipment
Back-adhesive labels and front-adhesive labels (for masks) available
Choose a wireless or a wired scanner
Why tag pieces of equipment with a barcode?
The Equipment Management program supports the tagging of equipment by means of barcodes, allowing you to identify pieces of equipment in a hassle-free, quick and fail-safe manner. With a click of the scanner button, you can select a piece of equipment for testing or retrieve its data from the database for editing. Moreover, it is impossible to mix up database records as long as the right barcode has been added to the right piece of equipment.
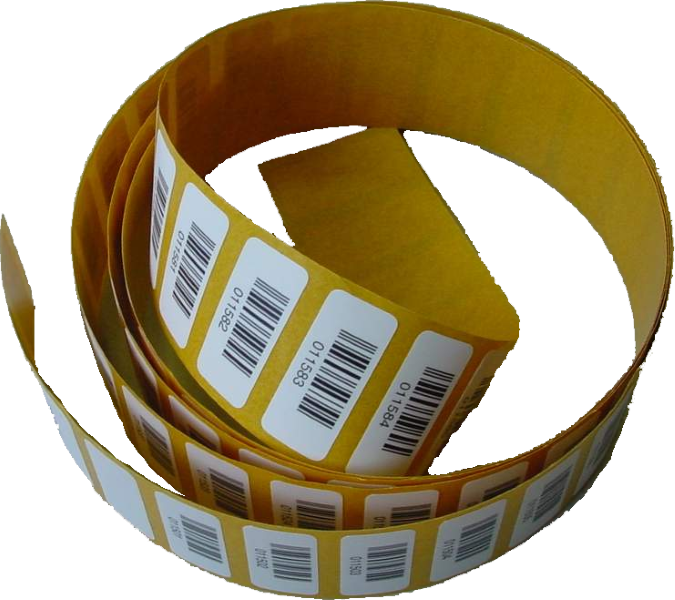
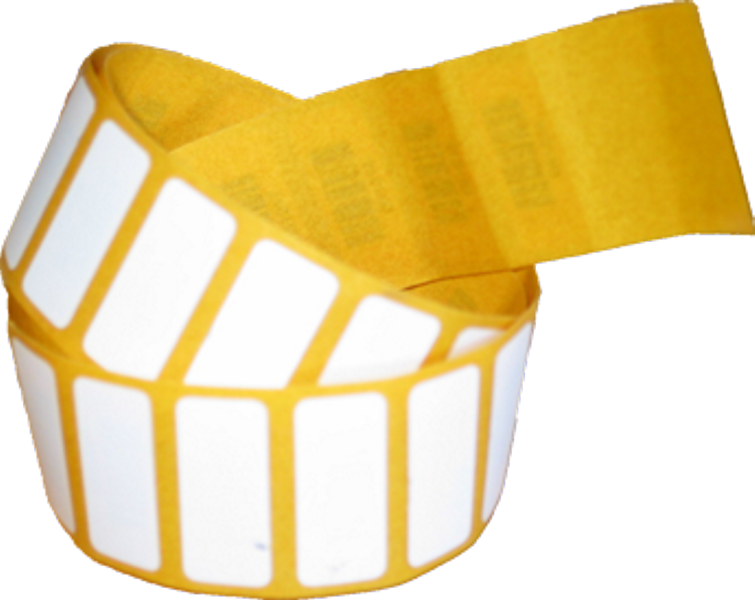
Barcode labels
We sell back-adhesive barcode labels (for installation on the outside of equipment) as well as front-adhesive barcode labels (for installation on the inside of a mask lens).
barcode labels
barcode labels
Every label has a 6-digit interleaved 2/5 code printed on it not only as a barcode but also in a human-readable format. The labels are made of high-quality POLYTRANS IB. They have excellent adhesive qualities, are wipe-resistant and withstand cleaning processes without any problems.

How to install the barcode labels
You should install the barcode labels in a place that makes them easy to scan while providing maximum protection from damage. It is also a good idea to always choose roughly the same place for the same kind of equipment as this will allow you to locate the labels more quickly.
For optimal adhesion, clean the installation site with a dry cloth before peeling the barcode label from its backing and sticking it onto the piece of equipment. Once you have tagged the piece of equipment, you need to add the barcode to its database record.
Examples
A tagged SCBA. The barcode label is located on the carrier plate of the device.
A tagged mask. The front-adhesive barcode label is located on the inside of the mask lens. When installing the barcode label in this place, you need to make sure that the code's scannability is not impeded by anything that may be printed on the lens.

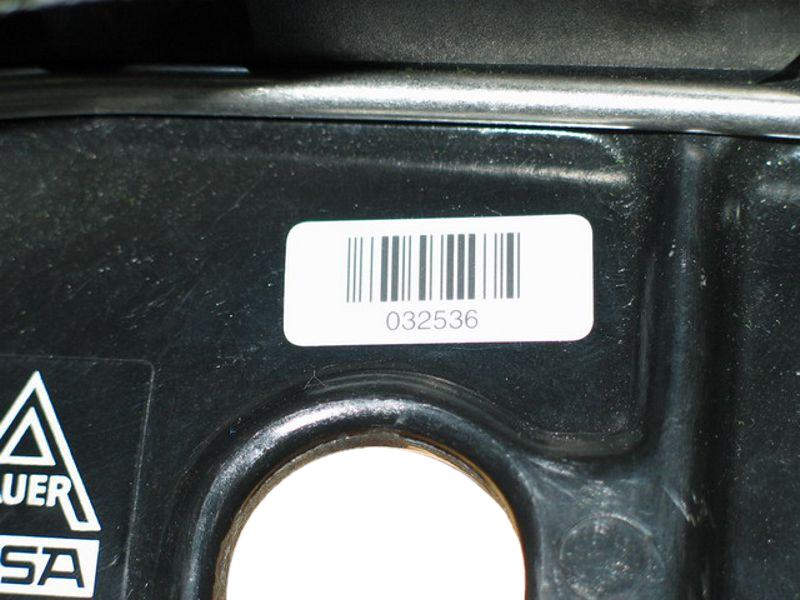
A tagged compressed-air cylinder. Ideally, place the label on the cylinder shoulder near the neck so as to guarantee perfect scannability.

Barcode scanners
There are different types of barcode scanners you can choose from, including wired USB scanners as well as wireless scanners. Irrespective of its type, the chosen scanner must be able to communicate with the computer via a serial (COM) or a virtual serial (USB COM) port for efficient use with pieces of software developed by Atemschutztechnik MENZL.
Wired barcode scanners
Very sturdy scanners for connection to a computer via a USB port. They provide excellent code-reading performance and project a green dot onto barcode labels after successful scanning.

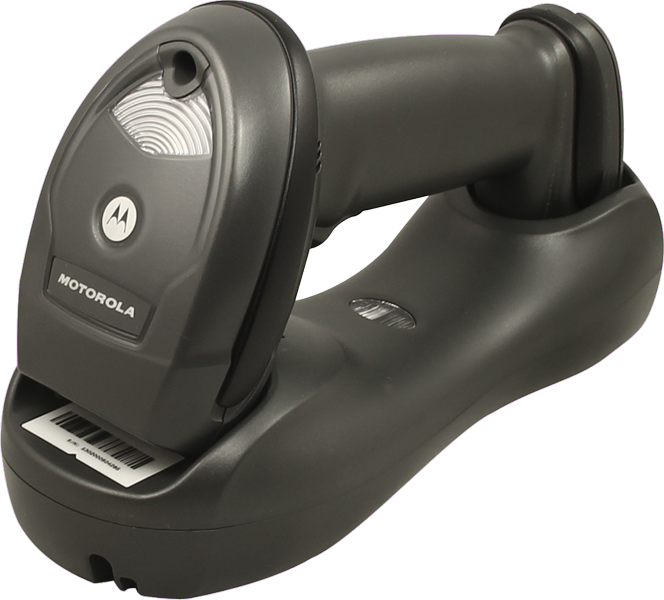
Wireless barcode scanners
Professional wireless handheld scanners. Scanned barcodes are wirelessly transmitted to the cradle which, in turn, sends them to the computer via a USB connection. The scanners offer excellent handling and very good reading performance with a code transmission distance of up to 15 metres.
Article numbers
Downloads
USB/CDC driver for „Datalogic“ barcode scanners (32-bit version / 64-bit version)
USB/CDC driver for „Motorola/Zebra“ barcode scanners (32-bit version / 64-bit version)
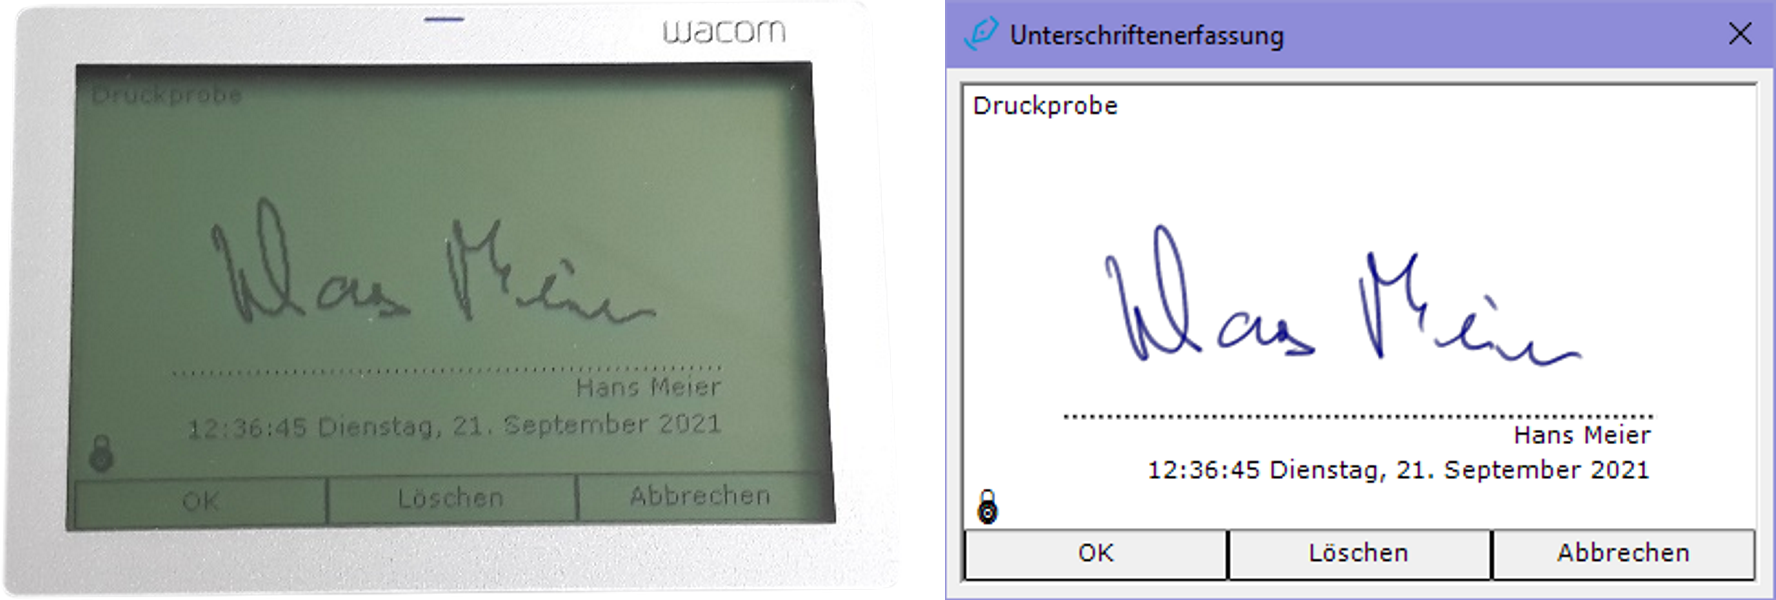
Signature pad

For capturing electronic signatures in the Equipment Management program
Why use a signature pad?
In conjunction with a Wacom STU signature pad, the Equipment Management program (version 5 or newer) lets you capture electronic signatures when using the following program features:
- equipment tests
- combined test reports
- lists of equipment given out
- cylinder pressure tests
- delivery notes
Depending on the program feature, you can capture either one or two signatures. If you have a multi-workstation computer network, the preferences of the Equipment Management program allow you to configure the workstations for which a signature pad is available.
Requirements for using a signature pad
Using a signature pad requires the following pieces of software, which you can easily download and install via the update feature of the Equipment Management program:
- Wacom STU driver
- Wacom tablet software
- Wacom signature SDK (32-bit or 64-bit version, depending on your computer's operating system)
Article numbers
Downloads
Remote-assistance modules
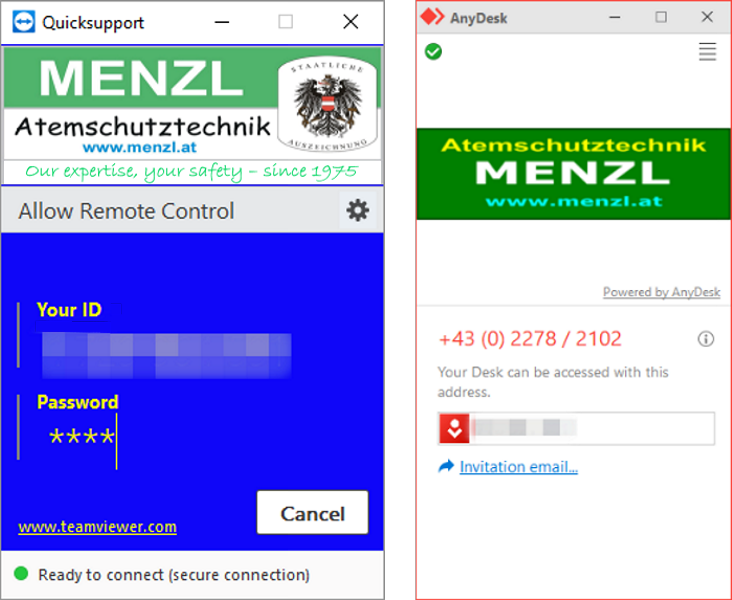
For getting real-time one-on-one support over the Internet in using our software and in troubleshooting problems
What is remote-assistance?
Our software comes with two remote-assistance modules included – QuickSupport5 (based on TeamViewer) and QuickSupportAD (based on AnyDesk). These modules make it possible for us to provide real-time, one-on-one assistance and support over the Internet in installing pieces of software, troubleshooting data-related problems and creating reports.
Activities that can be carried out by means of remote assistance
- maintaining and reviewing data
- repairing databases that may have become corrupted
- creating custom reports and making them available in the program
- installing program updates (provided you have the required OS privileges)
- installing drivers (provided you have the required OS privileges)
- downloading and uploading files
Requirements for using the remote-assistance feature
- Your computer needs to be connected to the Internet.
- You need to have the privileges required for remote assistance.
How to use the remote-assistance feature
When you launch one of the remote-assistance modules, a window displaying a computer-specific ID opens. Using this ID and a password hardcoded into the respective remote-assistance module, a MENZL staff member can connect to your computer over the Internet to help you in using our software and in troubleshooting software-related or data-related problems.
Cylinder Management program
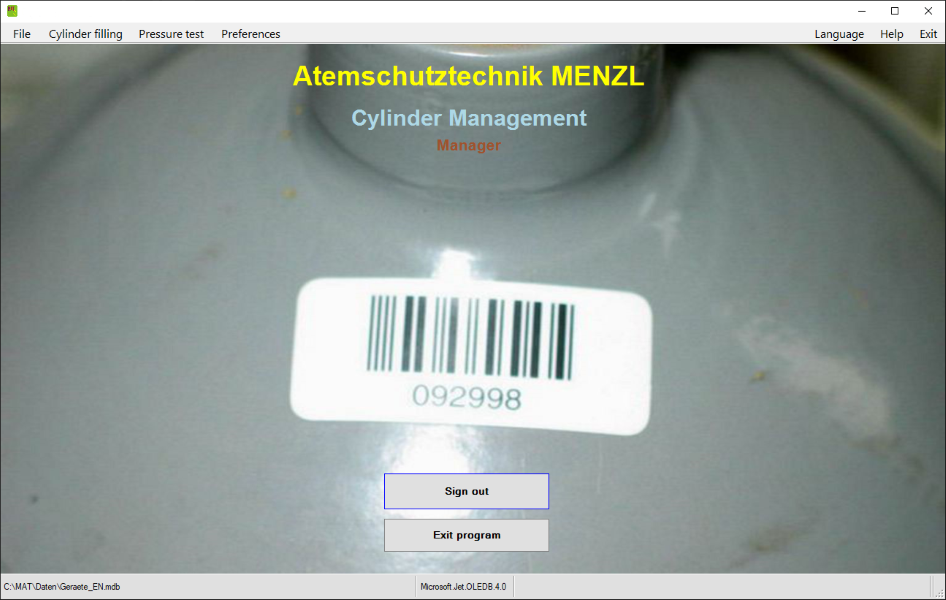
For managing cylinders in a completely hassle-free manner by means of barcodes
Why use the Cylinder Management program?
Points of cylinder filling have to keep a record of cylinder fillings. Frequently, forms are used for this purpose, requiring you to manually fill in the cylinder data (cylinder number, owner). What is more, prior to filling a cylinder, you have to make sure that it may actually be filled, i.e., you have to check whether or not the cylinder has exceeded its next due date for testing.
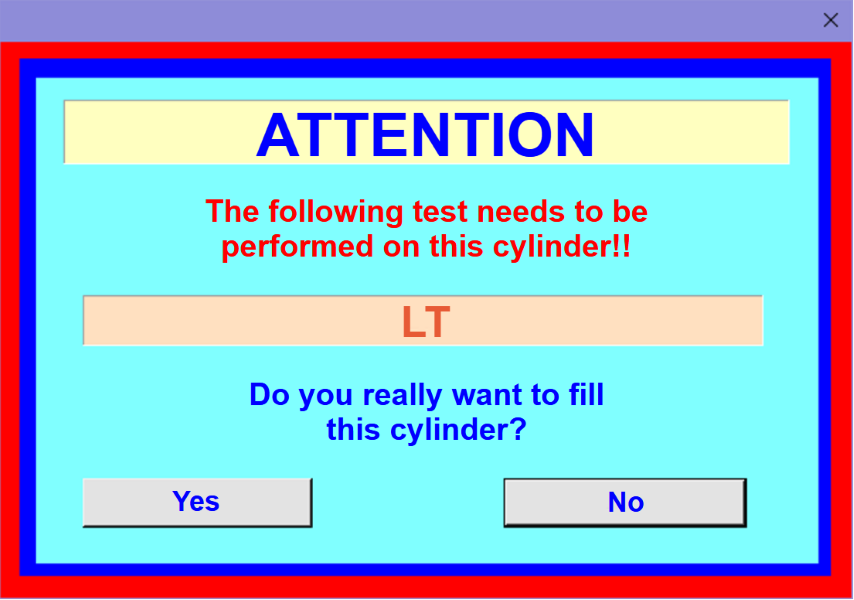
Obviously, it is often not exactly easy to carry out these important tasks when you are busy filling cylinders. Enter the Cylinder Management program and barcode-tagged cylinders: Once all of the cylinders that a point of filling has to deal with have been entered into the program and tagged with a barcode, you can keep a record of cylinder fillings in a completely hassle-free manner by simply scanning a cylinder’s barcode.
If a cylinder must not be filled for some reason (e.g. because it is due for testing), there will be a visual – and optionally also an acoustic – warning, and you will have to decide how to proceed.
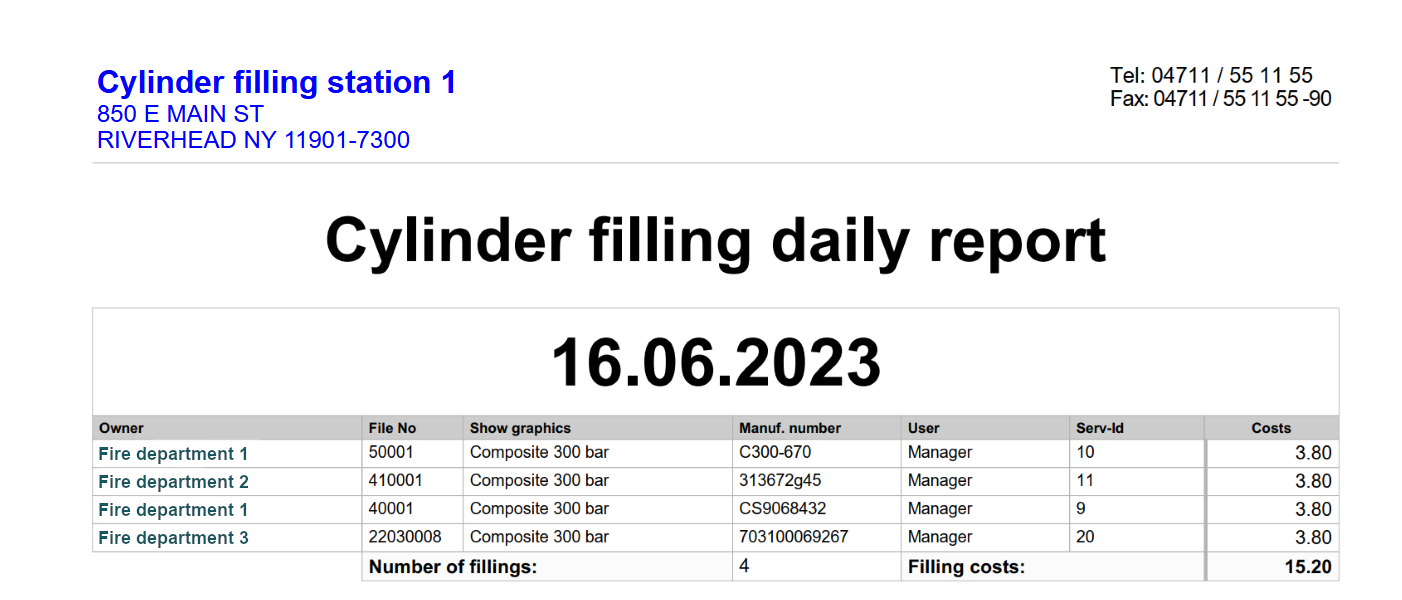
At any time, you can print a daily report or compile a number of statistics on the cylinders that have been filled.
Program features
Based on the Equipment Management program, an application with a proven track record, the Cylinder Management program allows you to do the following:
- manage program users
- manage cylinder owners
- manage cylinder types
- manage cylinder-related equipment data (incl. dates when tests are due)
- manage turnouts and training sessions
- keep a record of cylinder fillings
- keep a record of cylinder guest fillings
- benefit from due-date monitoring in determining whether cylinders may be filled
- use barcodes to tag and identify pieces of equipment
- perform and manage cylinder pressure tests
- search for cylinders that are due for testing
- report back cylinders that have been filled externally
- use comprehensive reporting and statistics features
Available program options
- program option for managing any kind of equipment
Program modes
When using the program, you can switch between the following modes as needed:
Standard
In this mode, scanning a barcode makes the program dsiplay all of the information that is available for the cylinder in question. To register a cylinder filling, you need to click the “Cylinder filled” button. This mode also allows you to manually select cylinders from the database, to add new cylinders to the database and to assign a barcode to the cylinder you have selected.
Filling mode
In this mode, scanning a barcode immediately registers the cylinder in question as having been filled. Via the preferences menu, you can make this mode the default for cylinder fillings, causing it to be activated automatically upon opening the cylinder filling window.
Guest filling
This mode allows you to register fillings of cylinders NOT stored in the database. You can activate this feature via the Extras menu of the cylinder filling main window.
Due-date monitoring and alerts
In “standard” mode and in “filling” mode (see above), the program uses the data stored in the database to automatically check whether or not a cylinder may be filled. If the cylinder in question has exceeded its next due date for testing, the program will alert you accordingly, asking you if you would like to fill the cylinder nonetheless.

Reports and statistics
Using the program’s comprehensive reporting and statistics features, you can, at any time, break down the data on equipment and cylinder fillings stored in the database in a wide variety of ways. Not only can the results be printed out but they can also be exported and saved in a number of formats.
Barcodes
We recommend tagging cylinders with barcodes so as to make the most of the Cylinder Management program.
Barcode scanners
There are different types of barcode scanners you can choose from, including wired USB scanners as well as wireless scanners. Irrespective of its type, the chosen scanner must be able to communicate with the computer via a serial (COM) or a virtual serial (USB COM) port for efficient use with pieces of software developed by Atemschutztechnik MENZL.
Wired barcode scanners
Very sturdy scanners for connection to a computer via a USB port. They provide excellent code-reading performance and project a green dot onto barcode labels after successful scanning.
Wireless barcode scanners
Professional wireless handheld scanners. Scanned barcodes are wirelessly transmitted to the cradle which, in turn, sends them to the computer via a USB connection. The scanners offer excellent handling and very good reading performance with a code transmission distance of up to 15 metres.
How to install the barcode labels
Install the barcode labels in a place that makes them easy to scan while providing maximum protection from damage. It is also a good idea to choose roughly the same place across all cylinders as this will allow you to locate the labels more quickly.
Ideally, place the label on the cylinder shoulder near the neck so as to guarantee perfect scannability. For optimal adhesion, clean the installation site with a dry cloth before peeling the barcode label from its backing and sticking it onto the cylinder. Once you have tagged the cylinder, you need to add the barcode to its database record.
Article numbers
| Cylinder Management program (incl. documentation of fillings) | 330-447 | Program option for managing any kind of equipment | 330-448 |
Stock management program option

Compatible programs
The “Stock Management” program option can be used with the Equipment Management program and the Cylinder Management program.
Features
This program option allows you to do the following:
- manage supplier and customer files
- manage a stock of replacement parts
- manage the procurement of replacement parts
- prepare quotations
- use basic invoicing features
- add a record of the replacement parts used to equipment tests